Magento 2 Payment Gateway API Classes
In the post, we are going to review new Payment Service Contracts (or Payment Gateway API) available in Magento 2. I will guide you through Command Interfaces and Service Classes which will help you to use them in further integrations with Payment Service Providers.
After reading this article you will:
- Understand Payment Gateway API
- Get best practices and examples of payment implementation
- Detailed overview of Gateway API classes and interfaces
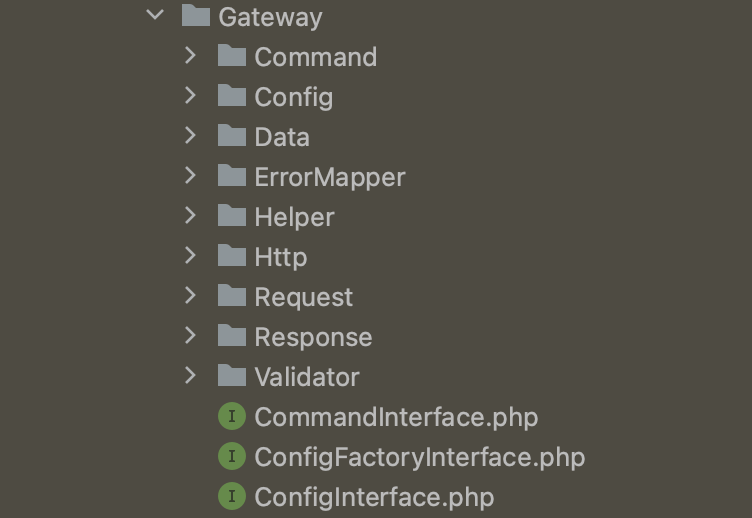
Magento 2 Open Source has Payment Service Contracts or Payment Gateway API release. You can get the latest version of Magento 2 Open Source here on GitHub. In case you plan to implement Payment Integration for Magento 2 it may be useful to get your hands with new Payment Gateway interfaces and classes that are located in the magento/magento-payment/Gateway directory.
Payment Service Contracts
Payment Service Contracts are located in the magento/magento-payment/Gateway directory including both interfaces and classes. Payment Service Contracts are also known as Payment API or Payment Gateway API (API stands for Application Programming Interface).
Payment Gateway API is different from service contracts API (Data and Service interfaces) in other Magento 2 modules. Simply because Payment API aims to provide a specific set of interfaces and extension points for your custom payment integration. Payment API provides a set of interfaces and extension points for your custom payment integration.
The Payment Gateway directory structure in Magento 2 looks like the following:
Payment Gateway classes and interfaces simplify and decrease the amount of custom code for payment integrations in Magento 2 with Payment Service Providers, for example, Global Payments, PayPal, Authorize.net, Braintree, etc.
Command Interfaces and Service Classes
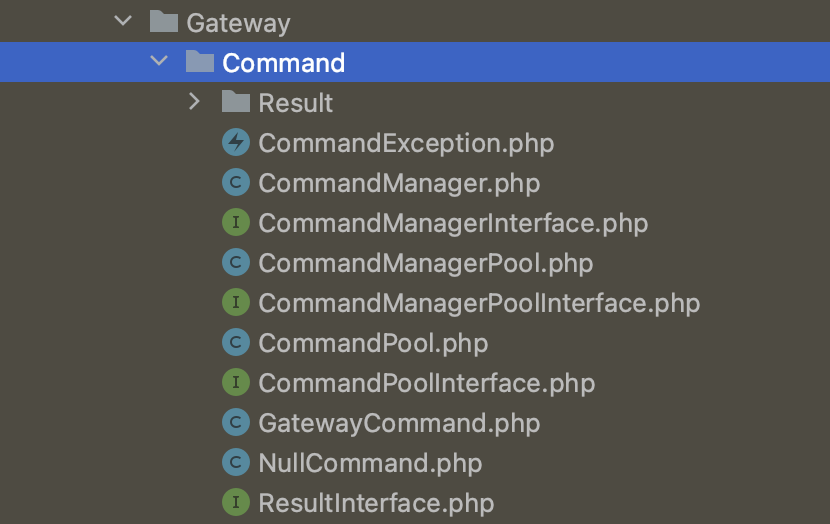
Let’s review Payment Gateway Command Interfaces and Service Classes. The Command directory consists of 2 command classes GatewayCommand and NullCommand, exception class, and Pool class with its Pool interface. In addition to these classes, the ArrayResult class is used for providing data as an array.
My opinion is that both GatewayCommand and CommandPool services classes are the most used here.
The CommandPool Class
The Magento\Payment\Gateway\Command\CommandPool class allows grouping commands into an executable set of command objects. These service classes is a great example of Command Pattern and Composite Pattern with the following benefits:
- Payment requests are encapsulated in objects. It enables more control and extension points via Magento 2 Plugins.
- Commands are configured via Dependency Injection. See
magento/magento-payment/etc/di.xmlmodule configuration file.
Payment Capture Implementation
For example, the Pronko\GlobalPayments\Model\Remote class passes Payment Capture request preparation to the Pronko\GlobalPayments\Model\Remote\Request\Capture class. The Pronko\GlobalPayments\Gateway\Command\CommandPool class holds the Capture command and other commands such as Authorize, Void, and Refund.
The di.xml configuration for CommandPool and GatewayCommand classes might look like this:
<config>
  <virtualType name=”Pronko\GlobalPayments\Model\Remote\Command\CaptureGateway” type=”Magento\Payment\Gateway\Command\GatewayCommand”>
    <arguments>
      <argument name=”requestBuilder” xsi:type=”object”>Pronko\GlobalPayments\Model\Remote\Request\Capture</argument>
    </arguments>
  </virtualType>
  <virtualType name=”Pronko\GlobalPayments\Gateway\Command\CommandPool” type=”Magento\Payment\Gateway\Command\CommandPool”>
    <arguments>
      <argument name=”commands” xsi:type=”array”>
        <item name=”capture” xsi:type=”string”>Pronko\GlobalPayments\Model\Remote\Command\CaptureGateway</item>
      </argument>
    </arguments>
  </virtualType>

  <type name=”Pronko\GlobalPayments\Model\Remote”>
    <arguments>
      <argument name=”commandPool” xsi:type=”object”>Pronko\GlobalPayments\Gateway\Command\CommandPool</argument>
    </arguments>
  </type>
</config>
he di.xml configuration file helps to achieve the following:
- Assigns
CommandPoolclass as a preference for theCommandPoolInterfaceinterface. - Creates
CaptureGatewayvirtual class. It allows configuring CaptureGateway class with a custom requestBuilder argument. - Creates
CommandPoolvirtual class with Capture command. - The virtual
CommandPoolclass is passed to thecommandPoolargument.
Here we use Pronko\GlobalPayments\Model\Remote\Command\CaptureGateway class to send a request to the Global Payments Payments Provider. Please note that the $commandSubject argument passed to the CommandInterface::execute() method must be an array.
Let’s have a close look at a Magento\Payment\Gateway\Command\GatewayCommand::execute() method logic:
    public function execute(array $commandSubject)
    {
        // @TODO implement exceptions catching
        $transferO = $this->transferFactory->create(
            $this->requestBuilder->build($commandSubject)
        );

        $response = $this->client->placeRequest($transferO);
        if ($this->validator !== null) {
            $result = $this->validator->validate(
                array_merge($commandSubject, ['response' => $response])
            );
            if (!$result->isValid()) {
                $this->processErrors($result);
            }
        }

        if ($this->handler) {
            $this->handler->handle(
                $commandSubject,
                $response
            );
        }
    }
The execute() method holds all necessary operations required to process communication with the Payment Service Provider:
- Request data is prepared by a Request Builder class based on Data passed from a
Pronko\GlobalPayments\Model\Remote::capture()method. - Request data is passed to a Transfer Factory class to create a Transfer object.
- Transfer object is passed to a client to send a request to a Payment Service Provider.
- The response is provided back from a client class.
- Response data is validated by the Validator object (optional).
- Response data is processed by the Handler object. Handler classes are used to prepare Payment objects (optional).
Validation
It is important to mention that the Magento\Payment\Gateway\Validator\ValidatorInterface interface is used to provide validation of the response from the Payment Service Provider. The request data should be validated as part of the Magento\Payment\Model\MethodInterface::validate() method call. There is a Magento\Payment\Gateway\Validator\CountryValidator class used in case there is a Country limitation for Payment integration.
Summary
In this post, we reviewed Command Interfaces and their Service Classes from Payment Service Contracts. As an example, we configured CommandPool and CaptureGateway command classes for handling the Payment Capture command in a Payment class. The GatewayCommand class holds common communication logic with Payment Service Providers.
I highly recommend using Payment Gateway API as a core API for any payment integration implemented for Magento 2 Open Source.
Build your own Magento 2 extension that integrates Authorize.net with Magento 2 Open Source and Adobe Commerce in our online course Payment Method in Magento 2.